September 5, 2011

Bathroom Demolition

Ryan and I spent the weekend taking apart the guest bathroom. We're talking serious demo here, i.e. walls came down. It's quite disconcerting to find a toilet and bathtub right out in the open, in the middle of the room at the top of the stairs. It reminds me of my cousin Scott's studio apartment in NYC where the bathtub was literally in the middle of the kitchen (he actually built a hinged countertop on top of the tub to maximize his usable kitchen space!). Here are the early stages of the transformation.


We always wondered why there was a weird bump out in the wall of the bathroom (behind the ladder). Why hadn't they just built the wall two inches over? After pulling down the drywall, we discovered the answer - a beam. Hmmm. Ryan crawled around in the attic and determined that it wasn't structural, so he removed it, exposing the exterior brick coated in what appears to be a black waterproof coating. We considered leaving the beam exposed, but I think it would have looked really out of place. When we rebuild, the wall will be (should be, anyway) nice and flat.


Since we're planning on moving the clawfoot tub to the opposite wall and we have a bit of plumbing to do in the space, we decided to just bite the bullet and move it out now. If anyone's wondering (we definitely were) we're estimating that our tub weighs about 250 pounds without water. Heavy, but not so heavy that the two of us couldn't move it on our own. Our bigger concern was that we might damage the floor boards if the feet were placed on a weak spot... yes, we had visions of our tub falling through to the first floor a la The Money Pit. To make sure that the weight was evenly distributed across the floor rather than just in the four spots where the feet rested, we shifted the tub inch by inch on two long pieces of plywood that we repositioned as we went.


It took us about half an hour to move it out of the bathroom and into the future office/current junk room. I'll be able to clean/refinish/paint it there. And what made me even happier than not having our floor collapse? The realization that the backside of the tub, which will be facing outwards in the new bathroom configuration, has one thin, smooth layer of yellowish paint on it and that the legs aren't painted at all. Thank ye, tub gods! I think a good scrub with some paint stripper and a wire brush should do the trick. The feet are dirty and cobwebby, but see how much definition they have?


All in all, it was a very satisfying few days of work.

August 29, 2011

Pardon Me, But...

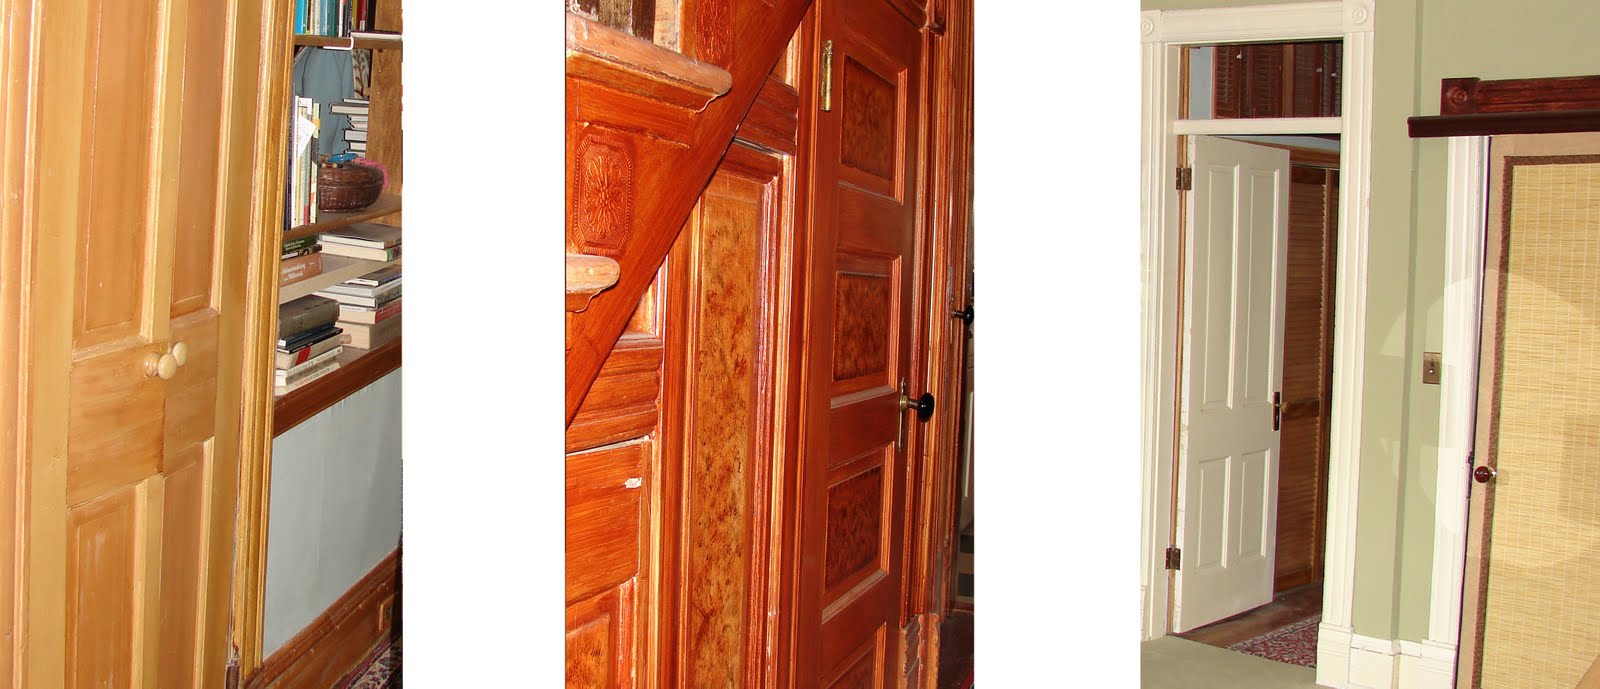
Why yes, we do happen to have a door painted the color of Grey Poupon! When we moved into the house, we also had a pink door, light brown doors, dark brown faux painted doors, orangey doors, white doors, doors covered with bamboo blinds, louvered bifold doors and unpainted French doors! Yikes! When we began painting our way through the house, we decided to pick one color for the trim and doors to make the spaces more unified. We chose Benjamin Moore Mayonnaise in a satin finish. It looks exactly like the color of mayo - off white and creamy - but the name is terrible! I've since taken to calling it "Creampuff."

Here's a selection of our doors from back in 2008.


I think after seeing that, anyone could appreciate the need to simplify! We actually replaced a lot of these doors with ones of the same panel design as the originals that we were lucky enough to find at an architectural salvage place in Washington, DC (The Brass Knob's Door Warehouse). At this point, most of the doors are painted, and today I tackled one of the worst offenders. It's the door to the future guest bedroom (currently our workshop) located at the top of the stairs. That means that it's visible from the downstairs hallway and it's the first thing you see when you go up the stairs. Uugh!

Here's a before shot in all of its mustard and BBQ sauce glory (I'm on a condiment theme here). I'll try not to get started on the Pepto colored bathroom door to the right.


I primed with one coat of Zinsser 1-2-3 and painted another coat with the previously mentioned "Creampuff"  (okay, Mayonnaise). It'll need one more coat before I can call it good, but I'm already so happy with the change!


Why exactly did I wait over two years to do that? I mean, I guess I've been pretty busy painting all of the other doors/surfaces in the house, but really! So much more peaceful, and dare I say sane?

It fits so much better with the rest of the house (see the white at the top of the stairs?). No more mustard!

August 28, 2011

Guest Bathroom Dreaming

The majority of work is done on our bathroom, and now that we've moved on to the next phase of our renovation, I can't help but dream about the guest bathroom. On the left is a drawing of the bath and office when we moved in, and on the right is how it will be laid out in the distant future (the rest of the architectural drawings of the house are under the tab House Plans).


We're shifting the wall between the office and the guest bathroom, and we'll probably switch the location of the sink and the bathtub too. Even though we're moving the wall in a bit at the back corner, we're also gaining some space at the front where the laundry closet used to be. I think the new layout will work much better because it will give more room around the bathtub and some storage space to the side of the sink.

Our tub is in pretty rough shape though. The inside has a few chips, which I can deal with (it is 100 years old after all), but the outside is really bumpy and sponge painted pink/orange. Not okay! Here's a photo.


Of course, if we do switch the tub to the other side of the room, the opposite side will be exposed, and who knows what that side looks like... Now that I've confessed that we've been living with  a sponge painted bathtub for over two years, I can share some photos of the painted clawfoot tubs (found here and here) that are making me want to grab a paint brush immediately.


Interesting that both of these bathrooms have wood floors, like our bathroom does. Hmm... something to consider. Of course, I'll have to wait to paint until we're much further along in the process. It's fun to dream and plan in the meantime though!

August 1, 2011

Neighborhood Shower Party!

For months now, we've forced friends and neighbors to look at the progress we've made on the bathroom every time they come over, and now that it's DONE, we feel as though we should have an open shower party. Any takers?

It took us a couple of weekends to finish tiling, grouting and sealing everything. The glass people came about two weeks ago to take the final measurements, and installed it over the course of four hours on Thursday. The caulk used in all of the corners and edges needed 24 hours to dry, so our first chance to use the shower was Friday after work (and I really needed it after spending the day in 100+ degree weather on a platform in the middle of a river looking at a 19th century shipwreck site). Anyway, we couldn't be happier with the end result of our work, so without further ado... our shower!


Now that you've seen it, don't you want to come to our shower party?! I love everything about it, and so far, we haven't had any floods or collapsed ceilings. I'm keeping my eye out for a ceramic stool to put in one of the corners like this one in Architectural Digest.


Chic and spa-like, yes? We're also thinking of framing some of our photos for the walls, so I'll update if I ever get to that project. For now, it's back to the finishing touches - a little more caulking, trimwork, and painting!

July 30, 2011

Nice Shower Niche!

With the three day weekend over July 4th, we were sure that we were going to finish tiling our shower. Sigh. So close, and yet, it's still not finished. At this point, the few tiles we have left to put in place all require careful measuring and cutting, so it's slow going (at least for us first-timers). But we're moving forward, and we've scheduled the glass fabricators to come out and measure next week - that'll motivate us to finish for sure!

Even though we still have to make a few tricky cuts, the most difficult part is actually finished! We spent last weekend working on the niche, which took us way longer than I'd like to admit... The first step was to determine exactly where the niche would be located so that all of the tiles and grout lines would be matched up. We put two rows of tile in place to get the overall height, and then added in the thickness of the shelves and niche tiles to figure out how big the hole needed to be.


Don't mind the tiles on the left hand side that fell off the wall while we were cutting the hole - that's perfectly normal. Just kidding! We were still figuring out the whole thinset mortar thing.  Next, we built out the niche walls using cement board so that it was the exact width we'd need. We waterproofed using the same Kerdi material that we used for the rest of the shower, following the instructions over on the Floor Elf's tiling blog. After that, we made some cuts to our border tiles, slapped them up on the wall, and got to the pretty glass tile part. Finally.


The finish line is in sight!